Velocity - Android SDK - Integration Guide
1. Document Details
1.1 Scope
This document provides information to assist with the integration of the Velocity Payment Orchestration Platform (POP) software development kit (SDK) with an Android native mobile application.
Note: Integration with an iOS mobile application has a similar workflow, but the details are provided in the Velocity – iOS SDK – Integration Guide v1.12.
1.2 Version
The following table provides details about the various SDKs and features listed in the document.
| Document Version | SDK Name | SDK Version | Additional Features |
|---|---|---|---|
| 1.04 | mPoint | 2.3.1 |
|
| 1.05 | mPoint | 2.3.2 |
|
| 1.06 | mPoint | 2.3.3 |
|
| 1.07 | mPoint | 2.3.3 | Introduced the following:
|
| 1.08 | mPoint | 2.4.0 | Introduced the following:
|
| 1.09 | mPoint | 2.4.0 | Updated the template. |
| 1.10 | mPoint | 2.5.0 | Introduced the following:
|
| 1.11 | mPoint | 2.5.0 | Introduced the following:
|
| 1.12 | mPoint | 2.6.0 | Introduced the following:
|
| 1.13 | mPoint | 2.6.0 | Updated document template. |
2. Introduction
Velocity SDK facilitate integration of Velocity POP with native mobile application. SDKs can be integrated with both Android and iOS applications. The SDKs use asynchronous communication when transmitting data to the Velocity server or a Payment Service Provider (PSP).
The following are some features of SDKs:
- Simple integration with a few calling methods
- Multiple payment methods such as APM, wallets, mVault or stored card, and cards with 3DS and
non-3DS - Native user interface (UI) elements
- A familiar technology stack for application developers
- Capability to control and brand the payment screen
- Application and POP communication through SDKs
3. Glossary of Terms
The terms used in this document are listed in the table below.
| Terms | Description |
|---|---|
| CPD | CellPoint Digital. |
| POP | Payment Orchestration Platform. |
| HPP | Hosted Payment Pages. |
| PSP | Payment Service Provider. |
| ACQ | Acquirer. |
| Merchant | Any business who sells goods or services and accepts payments from customers; also referred to as Clients. |
| Customers | Individuals who want to buy goods and services from the merchant. |
| APM | Alternative Payment Methods. |
| SDK | Software Development Kit. |
4. Prerequisites for Integration
After you are onboarded on the Velocity platform, you can start integrating your mobile application with the Velocity SDK.
Before you start the integration process, you must ensure that you have the following:
- Velocity SDK, which includes the following:
- Base SDK
- mPoint SDK
- Third-party SDK (optional)
- Nexus URL
- CPD credentials such as:
- Username
- Password
- Client ID
- Account ID
- MESB_URL
- Country and currency for which transaction is enabled
- List of CPD country codes
- Salt values for payment fraud transaction (optional)
- Sample test application
5. SDK Integration Overview
The Velocity SDK Payment Process Workflow sequential diagram is shown below.

5.1 SDK Integration Workflow
After a customer selects your products or services, they click the payment option to finalize the purchase. Your mobile application Velocity POP enables processing of payments through the Velocity SDK in the following manner:
- Your customers click the payment button.
- Your application authorizes a payment using the Velocity SDK.
- The SDK authorizes the payment through the back end of the Velocity POP.
- The back end of the Velocity completes the authorization and returns the payment status response.
- The Velocity SDK provides the status back to your mobile application, which processes the payment through the PSS based on the payment status.
Note: Payment cards and card-based forms of payment, such as Google Pay, are authorized through a merchant’s acquirer. Other forms of payments, such as PayPal, are authorized directly with the APM. These processes ensure that the merchant receives settlement directly from the acquirer for the card-based payment.
6. Integrating SDK
Velocity SDK enables asynchronous communication using the delegate/interface pattern. The SDK enables your mobile application to implement the methods defined by mPoint payment interface.
To integrate the payment methods using the Velocity SDK, complete the following steps:
- Integrate the SDK using the CPD credentials for communicating with Velocity POP.
- Add the SDK path in Gradle file with specific version provided by CPD.
Note: The versions of these files are updated at regular intervals. Check with the CPD technical team if you have the latest version.
- Add nexus repository path in Gradle file
- Run Gradle Build command.
- Instantiate the SDK using the CPD credentials for communicating with Velocity POP.
- Initializing a payment using the SDK involves the following tasks:
- Invoke the initialize method on the SDK instance.
- Handle the SDK call back through the selected payment method.
- Construct the graphical user interface (GUI) for enabling customers to make payment using their selected payment method.
- Implement the following interfaces:
- mPointWalletDelegate
- mPointSchemeOwnerDelegate
- mPoint3DSecureDelegate
- mPointDelegate
- mPointWebViewDelegate
- mPointSchemeOwnerDelegate
- mPointForeignExchangeDelegate
- mPointGetBalanceDelegate
allprojects {
            repositories {
maven {
url = uri("https://nexus.cellpointmobile.com/content/repositories/internal")
credentials {
username = "default-read"
password = "CPMRead4321"
}
}
}
}
Note: Instantiating and initializing a payment are common to all payment methods such as card payment, save cards, APM, and wallet.
You can authorize a payment with an SDK for one of the following payment methods:
- Card payment
- APM
- Wallet
- Aggregators
- Offline Payments
- Vouchers
- Split Payment
Note: CPD recommends you implement the following call back error methods for error handling in your application:
handleStatusis called for high-level errors when the back-end rejects the request and returns one or more status codes giving the reason, or for operations that do not return any data, where the back-end returns the operation status.handleErroris called for low-level errors such as network connectivity problems.
Note: For handling web-view redirects, SDK supports devices with Android 5.0 (application programming interface, or API, level 21) and above only.
6.1 Instantiate SDK
To instantiate the SDK, you must:
- Implement interfaces.
- Ensure that you have all the prerequisites.
Instantiate the SDK by providing the appropriate configuration details as shown in the following code sample:
this._mpoint = mPoint(URL ("[CPD provided URL]"),
        this,
        "username",[USERNAME]
        "password", [PASSWORD]
        clientid, [CLIENT ID]
        accountid, [ACCOUNT ID]
        null,
        context,
        null,
        RecordMap<String, String> (),
        arrayOf(ClientInfo.IDENTIFIERS.DEVICEID)
this._mpoint.mode = mPoint.OUTPUT_MODE.NONE)
Note: Instantiating the SDK is common for all payment methods.
6.2 Initialize Payment
Initialize the payment transaction by invoking the initialize method of SDK as shown in the following code sample:
var mobile: Long = [MOBILE NUMBER];
var email: String = "[EMAIL ID]";
var countryId = CountryConfig.USA;   //[AMOUNT] for USA
var currencyId = [CURRENCY_ID]
var operatorId = countryId * 100;
var amount = [AMOUNT];
amount= amount*100;
var orderID : String = "[ORDER ID NUMBER]";
var mPointOrderInfo = [ORDER_INFO_AID_DATA]
var txnType: String = mPointTxnInfo.TXN_TYPES. MPOINT_SHOPPING_ONLINE; // An example of Search and Book Flow
mPointClientInfo  clientInfo = mPointClientInfo(appid, appversion, mPoint.LANGUAGES.da)
.setCountryId(countryId)
.setMobile(mobile)
.setEmail(email)
.setDeviceId(deviceid)
.setCustomerRef(customerRefId)
.setProfileId(profileId)

mPointInitializePaymentInfo paymentInfo = mPointInitializePaymentInfo()
                        paymentInfo.amount = amount
                        paymentInfo.country = CountryConfig.COUNTRIES.getValues().get(countryId)
                        paymentInfo.operator = operatorId
                        paymentInfo.mobile = mobile
                        paymentInfo.email = email
                        paymentInfo.language = mPoint.LANGUAGES.us
                        paymentInfo.setOrderno(orderID)
                       paymentInfo.clientinfo = clientInfo
                        paymentInfo.setCurrencyid(currencyId)
 paymentInfo.txnType = txnType
       paymentInfo.setHmac(hmac) // if hmac is available OR
                        paymentInfo.secretSalt = salt // if salt value is available
   paymentInfo.order = mPointOrderInfo
   paymentInfo.authToken = authToken
   paymentInfo.sessionId = sessionId (required during payment retries)
mpoint.initialize(paymentInfo);
Note: Consider the following items:
- Do not send a float number in the int amount. The SDK handles a float number by multiplying it with 100. For example, the floating digit 100 becomes 10000 and 100.29 becomes 10029.
- Invoking the initialize method is same for card payments, stored cards, APM, wallets and aggregators.
The following are optional parameters: mPointOrderInfo, authToken, and sessionId.
The following table shows a description of initialize payment parameters.
| Parameter | Type | Required | Description |
|---|---|---|---|
| mobile | Integer | Yes | The MSISDN of a customer without International Dialling Code. Note: Mobile number can be mandatory or optional, based on the requirement of a merchant or a PSP. |
| deviceId | Integer | Yes | The identification number of a device from which a customer makes a transaction. |
| String | No | The email address of a customer. Note: Email can be mandatory or optional, based on the requirement of a merchant or a PSP. | |
| countryId | Integer | Yes | The CPD-specific country code, which is available on request. |
| currencyId | Integer | Yes | The CPD-specific ID of a currency selected for making payment. |
| amount | Integer | Yes | The total amount that a customer is charged for a payment transaction in a country’s smallest currency. For example, the smallest currency of USD is penny. If the transaction amount is $120.30, then the amount field contains value 12030. |
| orderId | String | No | The alphanumeric order ID that a merchant generates. Note: Some Payment Providers have strict guidelines for the orderId. The recommended pattern is "[a-zA-Z0-9._-] |
| operatorId | Integer | Yes | The identification number of a customer’s Mobile Network Operator. A typical value is “country id” multiplied by 100. |
| hmac | String | No | It is deprecated from version 2.3.1 onwards and is applicable only for the mRetail SDK. |
| mPointOrderInfo | Object | No | The object of mPointOrderInfo. It contains details of order data and is required only for airlines. |
| authToken | String | No | The token that CPD provides for making payment. |
| sessionId | Integer | No | The session ID of a transaction. It is required only for required only if a customer retries making payment. |
| mPointInitialize PaymentInfo | Object | Yes | The object of mPointInitializePaymentInfo. It contains all details required to construct initialize an API request. |
| search and book | Object | Object | This is meant for travel merchants only. Refer to Search and Book Workflow for details. |
You can implement the following methods as part of the call back response for initializing a payment. Implement the displayAvailablePayments call back method to display the available payment method as shown in the following code sample:
override fun displayAvailablePayments(availablePayments: mPointAvailablePayments?, mpoint: mPoint?) {}
In availablePayments, the following sub-objects are available:
- Card
- Stored card
- APM
- Third-party wallet
- Aggregators
- Offline payment
- Vouchers
- Split Payment
7. Integration for Card Payment
To integrate the SDK for a card transaction, complete the following steps:
- Add the SDK path in Gradle file.
- Add nexus repository path in Gradle file.
- Run the Gradle Build command.
7.1 Instantiate SDK
You can Instantiate SDK as shown in the previous section.
7.2 Initialize Payment
You can Initialize Payment as shown in the previous section.
Note: If you have subscribed for Foreign Exchange (FX) Service, the FX API is called. To get the subscription of FX, sales team/system admin.
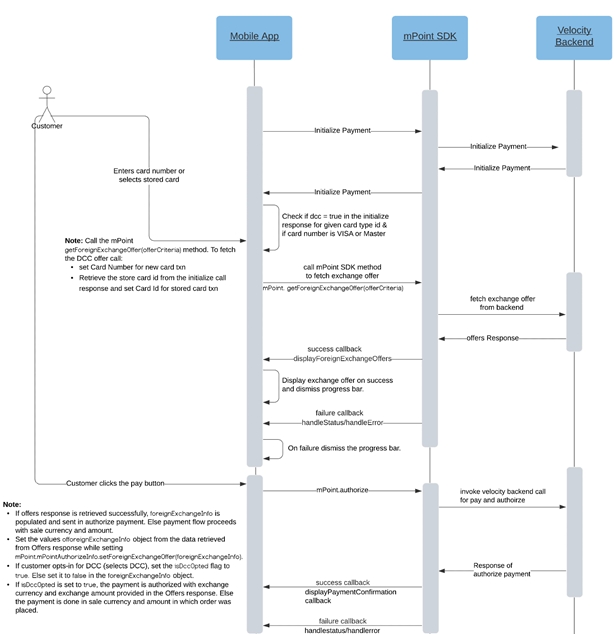
7.3 Foreign Exchange Service
FX Service provides an omnichannel solution for facilitating the payment of products and/or services in multiple currencies. The service helps to reduce the rate of drop-offs as customers can make payment in the currency they prefer.
The SDK fetches the amount in available card currency, which enables customers to see the option to make payment in multiple currencies. The FX API is called after the initialize API is successful.
Note: FX is available for Mastercard and Visa card transactions only for customers of merchants who subscribe to this service.
The following diagram shows how to integrate FX with the assumption that the communication with Velocity backend is successful.
To retrieve all available currencies of a card, use the getForeignExchangeOffer method. To use this method, refer to the following code sample.
var saleAmount: mPointAmountInfo = mPointAmountInfo().setCurrency(currency).setPrice(amount)
Use the following code sample to create the mPointExchangeOfferCriteria object for making payment with a new card:
var offerCriteria = mPointExchangeOfferCriteria()
                    .setOrderNumber(orderId)
                    .setCardNumber(cardnumber.toString())
                    .setCardType(cardtype)                                                  .setCountry(CountryConfig.COUNTRY_CODES.getValues()
                               .get(countryid))
                    .setSaleAmount(saleAmount)
                    .setTransactionId(_mPoint.txnInfo.id)                                   .setClientId(CLIENT_ID)
                    .setAccountId(ACCOUNT_ID)
                    .setClientInfo(clientInfo)

_mPoint.getForeignExchangeOffer(offerCriteria)
To handle the response of exchange offer, override the displayForeignExchangeOffers method and implement the mPointForeignExchangeDelegate interface as follows:
override fun displayForeignExchangeOffers (offer: mPointExchangeOffer?, mpoint: mPoint?) {
}
To consume a specific mPointExchangeOffer, use this exchange offer and create mPointForeignExchangeInfo as shown in the following code sample:
  var foreignExchangeInfo
  = mPointForeignExchangeInfo()
  .setId(offer?.foreignExchangeOfferId!!)
         .setExchangeAmount(offer.paymentCurrencyOffers[0]
    .exchangeAmount.price)                           .setExchangeCurrencyId(offer.paymentCurrencyOffers[0]
                                                                            .exchangeCurrency.isoNumericCode)           .setSaleCurrencyId(offer.paymentCurrencyOffers[0]
                                                                                                                                           .saleCurrency.isoNumericCode)                    .setSaleAmount(offer.paymentCurrencyOffers[0]
  .saleAmount.price)
      .setConversionRate(offer.paymentCurrencyOffers[0]
                         .offeredExchangeRate)
      .setHmac(offer.paymentCurrencyOffers[0].validationHmac)
7.4 Authorize Payment
To retrieve specific mPoint cardinfoobject, use the following method. You must provide the card number which your customer enters in the text field; it is an on-click event. This cardinfoobject gives information regarding the card type, such as Visa, Mastercard, and American Express; and maximum and minimum length of the card and card verification value (CVV) number. Based on this information, add validation and modification on your payment screen.
var cardtype = _mPoint.getCardFromPrefix(java.lang.Long.valueOf(cardNumer)!!)
7.4.1 FX Opt-in Transaction
An opt-in transaction is when a customer is making a payment with a new card and selects a card currency other than the original sale currency. The flow of an opt-in transaction is as follows:
- Complete the initialize payment successfully.
- Consume the FX API successfully.
- Finalize the payment offer and invoke the auth API.
- Customers opted to make payment in currency other than the sale currency.
- Send Opt-in as a Boolean flag as true.
- Send standard authorize parameters.
Note: The Opt-in and SetDccOpted depends on a merchant’s requirement.
Refer to Dynamic Currency Conversion to create the mPointForeignExchangeInfo object. For opt-in transactions, refer to the following code:
foreignExchangeInfo?.setDccOpted(true)
To support FX-based routing, send the service-type-id field in the foreign-exchange info node as it enables you to offer various services such as FX and PCC. Send the following ID in service-type-id field.
foreignExchangeInfo?.serviceTypeId = mPointForeignExchangeInfo.SERVICE_TYPE_ID.DCC_OPT_IN
7.4.2 FX Opt-out Transaction
In opt-out transactions, the customer has the option to make payment in available card currencies,
but chooses to make payment in the sale currency. The flow of an opt-out transaction is as follows:
- Complete the initialize payment successfully.
- Consume the FX API successfully.
- Finalize the payment offer and invoke the auth API.
- a. Customers opted to make payment using sale currency.
- Send Opt-in as a Boolean flag as false.
- Send standard authorize parameters.
Refer to Dynamic Currency Conversion to create the mPointForeignExchangeInfo object. For opt-in transactions, refer to the following code:
foreignExchangeInfo?.setDccOpted(false)
For FX opt-out transactions, send the following ID in the service-type-id field:
foreignExchangeInfo?.serviceTypeId = mPointForeignExchangeInfo.SERVICE_TYPE_ID.DCC_OPT_OUT
7.4.3 ID Values
The values for service-type-id field ID used for a transaction are double-digit numbers - XY in which:
- X represents the exchange service applicable for a transaction.
- Y represents the any one of the following types of exchange:
- 1, which means Opted
- 2, which means Not-opted
The following table shows the possible values of service-type-id number and how it is derived.
| ID (XY) | Service (X) | Opted (Y) |
|---|---|---|
| 11 | FX | Opted |
| 12 | FX | Not opted |
| 41 | PCC | Opted |
| 42 | PCC | Not opted |
Authorize the payment for a transaction for a card by invoking the authorize method of SDK as shown in the following code sample:
mPoint.authorize(mPointAuthorizeInfo(cardtype)
.setCardNo(java.lang.Long.valueOf(cardNumer))
.setCardExpMonth(Integer.parseInt(expiryMonth))
.setCardExpYear(Integer.parseInt(expiryYear))
.setCvc(tempCvv.toString())
.setNameOnCard(cardName)
.setStoreCard(isSaveCard)
.setCardValidFromMonth(validMonth.toInt())
.setCardValidFromYear(validYear.toInt())
.setClientInfo(clientInfo)
.setAddressInfo(addressInfo))
.setForeignExchangeOffer(foreignExchangeInfo)

.setViaAuthToken(true).setPassword(authToken)
Note: The setViaAuthToken parameter is required only if the authToken parameter is sent in request.
7.4.4 Sending FX Indicator
When the FX API gives an error, a status tag is returned in handleStatus method. As per regulatory requirements, send this status code in authorize API request.
Refer to the following code sample to fetch the status codes in handleStatus method:
var additionalData: RecordMap<String, String>? = null
….
override fun handleStatus(statusInfo: mPointStatusInfo?, client: Client?, p2: mPoint?) {
runOnUiThread {
if(statusInfo.statuses.size > 0 && statusInfo.statuses[0].containsKey("status")){
    val status = statusInfo.statuses[0]["status"] as RecordMap<*, *>
    val code : String = status["@code"] as String
additionalData = RecordMap()
    additionalData!!["cfx_status_code"] = code
}
 	   }
}
Refer to the following code sample to send FX indicator in authorize API request:
_mPoint.authorize(mPointAuthorizeInfo(cardtype)
.setCardNo(java.lang.Long.valueOf(cardNumer))
.setCardExpMonth(Integer.parseInt(expiryMonth))
.setCardExpYear(Integer.parseInt(expiryYear))
.setCvc(tempCvv.toString())
.setNameOnCard(cardName)
.setStoreCard(isSaveCard)
.setCardValidFromMonth(validMonth.toInt())
.setCardValidFromYear(validYear.toInt())
.setClientInfo(clientInfo)
.setAddressInfo(addressInfo))
.setForeignExchangeOffer(foreignExchangeInfo)
.addAdditionalData(additionalData))
.setViaAuthToken(true).setPassword(authToken)
Note: The setViaAuthToken parameter is required only if the authToken parameter is sent in request.
7.5 3DS Redirection
Implement the displayWebView method for 3DS redirection. This method generates a one-time password for a card transaction and provides a WebView instance. 3DS provides an additional layer of security.
The displayWebView method is used in all types of payment such as a stored card, wallet, and APM.
Note: Implementing 3DS redirection depends on the PSP you select for conducting transactions.
override fun displayRaw3DSecureChallenge(mpoint: mPoint): WebView
7.6 Instalments
Customers can use the Instalments feature to make payment in instalments, which is payable in set intervals over a defined period. To add support for card payment with instalments, implement the mPointGetInstallmentPlansDelegate interface.
After customers enter the 11-digit card number, call the getInstallmentPlans API to fetch the available instalment plans for that card shown as follows:
var cardNumber : Long
var cardInfo : mPointCardInfo
cardInfo = _mPoint.getCardFromPrefix(cardNumber)

val installmentPlansSearchCriteria = mPointInstallmentPlansSearchCriteria()
installmentPlansSearchCriteria.binNumber = cardNumber
installmentPlansSearchCriteria.cardInfo = cardInfo
_mPoint.getInstallmentPlans(installmentPlansSearchCriteria)
To receive result for the getInstallmentPlans API, call in the previous code sample and implement the mPointGetInstallmentPlansDelegate method. The result is returned in the following method:
override fun displayInstallmentPlans(arrListInstallments: java.util.ArrayList<String>?, p1: mPoint?) {
}
Note: The arrListInstallments parameter contains the list of all the Instalment Plans that are available. Populate this data in a drop-down widget so that a customer can select an instalment plan.
To pass the value of the selected instalment, send it in the authorize API in the setInstallmentValue(installmentValue) parameter as shown in the following code sample:
var installmentValue : String  // The Selected Installment Plan

_mPoint.authorize(mPointAuthorizeInfo(cardInfo)
.setCardNo(java.lang.Long.valueOf(cardNumer))
.setCardExpMonth(Integer.parseInt(expiryMonth))
.setCardExpYear(Integer.parseInt(expiryYear))
.setCvc(tempCvv.toString())
.setNameOnCard(cardName)
.setStoreCard(isSaveCard)
.setCardValidFromMonth(validMonth.toInt())
.setCardValidFromYear(validYear.toInt())
.setClientInfo(clientInfo)
.setForeignExchangeOffer(foreignExchangeInfo)
.setViaAuthToken(true)
.setPassword(authToken)
.setAddressInfo(addressInfo)
.addAdditionalData(additionalData)
.setInstallmentValue(installmentValue))
7.7 Split Payment
The split payment option allows customers to split the payment into equal amounts or to enter amounts to split the payment. To allow split payments, you need to check initialize payment response. If a split payment is available, you get split payment node in the response with all required details. You need to read the details from the initialize-payment response. See func override fun displayAvailablePayments(availablePayments: mPointAvailablePayments?, mpoint: mPoint?) {} for how to read split payment node.
After you read the split payment node as shown in above method, you have an array of split payment combinations of type mPointSplitCombination. Store that array for later use. It is the responsibility of the front end to give a UI which provides the customer a toggle switch to choose to split a payment or not. The front end also has to filter and select an appropriate combination object from the combinations array to perform a split payment transaction using the appropriate payment type.
The table below lists the payment type IDs for various form of payments.
| Payment method | Payment Type ID |
|---|---|
| Card | 1 |
| Voucher | 2 |
| Wallet | 3 |
| APM | 4 |
The following options are currently available combinations to perform split payment:
- Card + Card
- Voucher + Card
- Voucher + APM
- Voucher + Wallet
The combination object has an array of mPointSplitPaymentType which includes payment type ID, sequence, and a boolean property is_one_step_authorization. To perform a split payment with Card + Card,
the front end needs to filter and send a combination object with Payment Type ID as 1 for both the sequences. Similarly, the front end needs to filter and send an appropriate combination object in the authorize request to perform a split payment with other forms of payments.
The is_one_step_authorization property has an important role to play in a split payment ecosystem. If is_one_step_authorization value is true, the authorize request needs to include details of both forms of payment. If it is false, the authorize request needs to be called separately for both forms of payment.
After the completion of the first authorize request, the front end needs to call getTxnStatus api, from override fun displayPaymentConfirmation(txn: mPointTxnInfo?, code: Int, mpoint: mPoint) {} method. The response is returned in handleTxnStatus method shown below. If the is_one_step_authorization value is true, you need to poll getTxnStatus api until it returns a success or failure. If value of is_one_step_authorization is false, you need to read the pending amount from the response and make an initialise payment request with that pending amount and session ID.
Refer to the below sample code sample to understand how to call authorize, getTxnStatus and initialise methods.
Note: This code sample is taken from our application to give you an idea of how to integrate or call any given method on mPoint SDK. You need to implement your own classes wherever required.
The code show below is a sample of the calling authorize with split payment method with Card + Card.
var mPointSplitCombination: mPointSplitCombination? = null
var priceInfo: PriceInfo? = null

for(splitCombination in this.splitPayment!!.splitCombinations){
    for(paymentType in splitCombination.paymentType){
        if(paymentType.id == mPointCardInfo.PAYMENT_TYPES.CARD.id ){
            mPointSplitCombination = splitCombination
        }
    }
}


priceInfo = PriceInfo(getCountryCode(country),
                    (((tempAmount.toFloat()) * getDecimalPointMultiplierFromCurrencyId(currencyCode)).roundToLong()),
                    null, null, null, currencyCode,  -1)


if(null != mPointSplitCombination && null != priceInfo && isSplit){
        _mPoint.authorize(mPointAuthorizeInfo(cardtype)
            .setClientInfo(clientInfo)
            .setViaAuthToken(true)
            .setPassword(authToken)
            .setCardNo(java.lang.Long.valueOf(cardNumer))
            .setCardExpMonth(Integer.parseInt(expiryMonth))
            .setCardExpYear(Integer.parseInt(expiryYear))
            .setCvc(tempCvv).setNameOnCard(cardName)
            .setStoreCard(isSaveCard)
            .setCardValidFromMonth(validMonth.toInt())
            .setCardValidFromYear(validYear.toInt())
            .setForeignExchangeOffer(foreignExchangeInfo)
            .setAddressInfo(addressInfo)
            .addAdditionalData(additionalData)
            .setInstallmentValue(installmentValue)
            .setPendingSplitAmount(priceInfo)
            .setSplitCombinations(mPointSplitCombination))
}
7.8 Payment Confirmation
Implement the displayPaymentConfirmation call back method to receive the transaction status as shown in the following code sample:
Implement the displayPaymentConfirmation call back method to receive the transaction status as shown in the following code sample:
When using the split payment option, after getting callback in displayPaymentConfirmation you need to call getTxnStatus method to retrieve status of the transactions. When calling the getTxnStatus pass session ID (available in mPoint class) to retrieve all transactions from the current session. To call getTxnStatus, use the following code sample:
if(isSplitPaymentApplicable){
    	if(mpoint!!.sessionId != null && mpoint.sessionId.isNotEmpty()){
   		mPoint.delegate = this
              mPoint.getTxnStatus(-1, "", mpoint.sessionId, clientInfo)
  	  }
}
To get transaction statuses response implement following delegate method:
override fun handleTxnStatus(arrListTxnStatusInfo: ArrayList<mPointTxnStatusInfo>?, paymentStatus: Int, arrListLinkedTransactions: ArrayList<mPointLinkedTransactions>?, mPoint: mPoint?) {

            runOnUiThread {
                var pendingAmount: Long = 0

                if(null != arrListTxnStatusInfo && arrListTxnStatusInfo.size > 0){
                    for (txnStatusInfo : mPointTxnStatusInfo in arrListTxnStatusInfo){
                        // Retrieve Pending Amount
                        pendingAmount = txnStatusInfo.pendingAmount
                    }
                }

                when (paymentStatus) {
                    com.cellpointmobile.sdk.mPoint.PAYMENT_STATUS.MPOINT_PAYMENT_STATUS_PENDING.id ->
                    // Poll getTxnStatus()
                    getTxnStatus(mPoint!!.sessionId)
                    com.cellpointmobile.sdk.mPoint.PAYMENT_STATUS.MPOINT_PAYMENT_STATUS_COMPLETE.id -> {
                        if(pendingAmount == 0L)
                            // Split Payment Successful
                        else
                            // Retry Payment with Pending Amount
                    }
                    com.cellpointmobile.sdk.mPoint.PAYMENT_STATUS.MPOINT_PAYMENT_STATUS_FAILED.id -> {
                        // Retry Payment with Pending Amount
                    }
                }
            }
    }
The merchant front end reads the response received to know the payment status. Read the paymentStatus parameter to know the status of the payment. If a transaction status has payment status as:
- • Pending: call the getTxnStatus API again until you get the payment status either as Successful or Failed.
- Complete: the payment is successful.
- Failed: retry the payment.
To retry the payment, initialize the payment with the pending amount. This action helps a customer complete the payment using any option.
Send the pending amount you received from back end in the initialize request. After you initialize, a customer can complete the payment using any available payment option or can split the payment. This process repeats until the transaction is successful, fails, or maximum retries are attempted.
Note: If a customer decides not to retry a failed payment, call the Post-Status API as shown in the following code sample to notify that the session is complete:
mPoint.postStatus(mPoint.sessionId)
7.9 Handle Error
A handle error occurs when there an error in parsing. The status code reveals the type of error that has occurred in the SDK. For details of the status code, refer to Status Codes.
override fun handleError(errorInfo: mPointErrorInfo, client: Client, mpoint: mPoint) {}
7.10 Handle Status
The status codes are returned by the SDK in a call back to the handleStatus method. The method enables the application to handle the status appropriately by implementing the method as shown in the following code sample:
The handleStatus method shows an error in the CPD server.
if(isSplitPaymentApplicable){
    if(statusInfo!!.sessionId != null && statusInfo.sessionId.isNotEmpty()){

        mPoint.delegate = this
  mPoint.getTxnStatus(-1, "", statusInfo.sessionId, clientInfo)

  	  }
}
To get transaction statuses response implement handleTxnStatus delegate method and repeat the same steps as mentioned above in handleTxnStatus method.
8. Integration for Stored Card
To opt for the save card feature, you can contact the CPD team during the onboarding process. You can select the either the CPD card vault or a third-party vault. You need to send an authentication token for a single sign-on.
- When the SDK receives an initialize response, it checks if the response contains an mPoint Store-card.
If it contains a store card
- The SDK notifies the application that the store cards are available.
- The SDK provides a callback in the displayAvailablePayments method.
- You can authorize transactions for which customers use a stored card by providing CVV.
If the transaction is successful, you receive a callback in
displaPaymentConfirmation.
8.1 Initialize Request
You can Initialize Payment as given in the previous section.
Note: In initialize request for cards stored in Velocity wallet, you need to send an auth token or SSO token to authenticate a customer.
Initialize Response
To initialize a payment using stored cards, show the cards stored in a wallet. Implement the displayAvailablePayments call back method to display the available wallets as shown in the following code sample:
override fun displayAvailablePayments(availablePayments: mPointAvailablePayments?, mpoint: mPoint?) {}
In the availablePayments, the following sub-objects are available:
- Card
- Stored card
- APM
- Third-party wallet
- Aggregators
- Offline Payment
- Vouchers
8.2 Dynamic Currency Conversion
To make payment for a stored card, create the mPointExchangeOfferCriteria object; instead of card number, send card ID as shown in the following code sample:
var offerCriteria = mPointExchangeOfferCriteria()
                    .setOrderNumber(orderId)
                    .setCardId(selectedCard.id)                                             .setCardType(cardtype)                                                  .setCountry(CountryConfig.COUNTRY_CODES.getValues()
                               .get(countryid))
                    .setSaleAmount(saleAmount)
                    .setTransactionId(_mPoint.txnInfo.id)                                   .setClientId(CLIENT_ID)
                    .setAccountId(ACCOUNT_ID)
                    .setClientInfo(clientInfo)
_mPoint.getForeignExchangeOffer(offerCriteria)
8.3 Authorize Card
You authorize payment either by showing a new card or a stored card. To authorize a card payment, show the cards stored in the vault, provide auth token, billing address, and client information. You can enable customers to provide their card CVV, depending on the PSP for a transaction.
8.3.1 FX Opt-in
An opt-in transaction is when a customer is making a payment with a new card and selects a card currency other than the original sale currency. The flow of the opt-in transaction is as follows:
- Complete the initialize payment successfully.
- Consume the FX API successfully.
- Finalize the payment offer and invoke the auth API as follows:
- Customers opted to make payment in currency other than the sale currency.
- Send opt-in as a Boolean flag as true.
- Send standard authorize parameters.
Note: The opt-in and SetDccOpted depends on a merchant’s requirement.
Refer to Dynamic Currency Conversion to create the mPointForeignExchangeInfo object. For opt-in transactions, refer to the following code.
foreignExchangeInfo?.setDccOpted (true)
8.3.2 FX Opt-out
In opt-out transactions, the customer has the option to make payment in available card currencies but chooses to make payment in the sale currency. The flow of an opt-out transaction is as follows:
- Complete the initialize payment successfully.
- Consume the FX API successfully.
- Finalize the payment offer and invoke the auth API as follows:
- Customers opted to make payment using sale currency.
- b. Send opt-in as a Boolean flag as
false. - Send standard authorize parameters.
Refer to Dynamic Currency Conversion to create the mPointForeignExchangeInfo object. For opt-in transactions, refer to the following code.
foreignExchangeInfo?.setDccOpted(false)
The following code is an example of making payment with a new card with an option to save the card. To save a card set the value of setStoreCard as true, else set it as false. When the next payment is made, the stored cards are displayed.
_mPoint.authorize(mPointAuthorizeInfo(cardtype)
.setCardNo(java.lang.Long.valueOf(cardNumer))
.setCardExpMonth(Integer.parseInt(expiryMonth))
.setCardExpYear(Integer.parseInt(expiryYear))
.setCvc(tempCvv.toString())
.setNameOnCard(cardName)
.setStoreCard(false)
.setCardValidFromMonth(validMonth.toInt())
.setCardValidFromYear(validYear.toInt())
.setClientInfo(clientInfo)
.setAddressInfo(addressInfo))
.setForeignExchangeOffer(foreignExchangeInfo)
To authorize a transaction using stored card, implement the following code:
mPoint.authorize(mPointAuthorizeInfo(cardtype)
.setTypeId(mPoint.AUTH_CARD)
.setPassword(authToken)
.setCvc(cvc)
.setViaAuthToken(true)
.setAuthToken(authToken)
.setForeignExchangeOffer(foreignExchangeInfo)
.setAddressInfo(addressInfo)
.setClientInfo(clientInfo))
To send authentication token during a transaction, set the value of setViaAuthToken to true. If you set it as false, the authentication token is not sent.
8.4 3DS Redirection
Implement the displayWebView method for 3DS redirection. This method generates a one-time password for a card transaction and provides a WebView instance. 3DS provides an additional layer of security. The displayWebView method is used in all types of payment such as stored card, wallet, and APM.
Note: Implementing 3DS redirection depends on the PSP you select for conducting transactions.
override fun displayRaw3DSecureChallenge(mpoint: mPoint?): WebView
8.5 Payment Confirmation
Implement the displayPaymentConfirmation call back method to receive the transaction status as shown in the following code sample:
override fun displayPaymentConfirmation(txn: mPointTxnInfo?, code: Int, mpoint: mPoint) {
        Log.d(TAG, "displayPaymentConfirmation")
    }
8.6 Create Account
Invoke the saveAccount call to receive a callback in display to create, and then save an account.
Invoke the saveAccount call to receive a callback in display to create, and then save an account.
You must configure at least one of the following parameters to enable customers to create a profile:
- Mobile
- Email address
- Customer reference or customer ID
Note: A customer ID is unique and depends on the configured identification parameter.
You can configure this API in the following manner:
- Store account of customers directly in mPoint, which users can access using a password.
- Use single sign-on to verify a profile:
- Valid for both mProfile and third-party profile (mandatory)
- You must share authorization token with request if you are using an external CRM.
- You can authorize transactions for which customers use a stored card by providing CVV.
If the transaction is successful, you receive a callback in
displaPaymentConfirmation.
An eua-id is created after the profile of your customer is saved with Velocity. The following table provides the values of eua-id used to identify APIs that are called.
| Eua-id | APU method used |
|---|---|
| -1 | Save account |
| Greater than 0 | Save account |
The descriptions of the parameters are listed in the table below.
| Parameter | Type | Description |
|---|---|---|
| fullname | String | The full name of the customer; pass this value as null to avoid collecting this information. |
| card | Integer | The full name of the customer; pass this value as null to avoid collecting this information. |
| cardname | String | The card name entered by a customer; pass it as null if the does not name the card. |
| address | String | The billing address of a customer. |
| authToken | String | The authentication token generated when a customer logs in. |
8.7 Save Card
When you receive callback in the display save card method, invoke the following method to save the profile of a customer. You must configure at least one of the following parameters to enable customers to create a profile:
- Mobile
- Email address
- Customer reference or customer ID
Note: A customer ID is unique and depends on the configured identification parameter.
You can configure this API in the following manner:
- Store account of customers directly in mPoint, which users can access using a password.
- Use single sign on to verify a profile: Valid for both mProfile and third-party profile (mandatory)
- You must share authorization token with request if you are using an external CRM. An eua-id is created after the profile of your customer is saved with Velocity.
The following table provides the values of eua-id used to identify APIs that are called.
Note: Invoke the save card payment flow only.
public void _saveCard(card : mPointCardInfo, name : String, clientinfo : mPointClientInfo, preferred : Boolean, address : mPointAddressInfo, authToken : String, cardHolderName : String)
The descriptions of the parameters are listed in the table below.
| Parameter | Type | Description |
|---|---|---|
| card | Integer | The payment card which was used for an authorization. |
| name | String | The card name entered by a customer; the value is Null if no changes are made to the card name. |
| clientinfo | String | The clientinfo object used for identifying a customer. |
| preferred | String | The value for this parameter can be one of the following:
|
| address | String | The billing address of a customer. |
| authToken | String | The authentication token generated to enable a customer to log in. |
8.8 Log in to Velocity Wallet
Your customers can log in to their profile using their credentials. You need to send an authentication token or SSO token to mPoint login API to authenticate them.
Note: The profile system can be of Velocity, merchant, or third-party.
You can use the following code sample for an SSO token:
public void loginViaToken(authToken: String, clientinfo : mPointClientInfo)
8.9 Update Card
You can implement the updateCard method to update the
- Cards of your customers’ accounts
- Details of the customers’ stored cards
The descriptions of the parameters are listed in the table below.
| Parameter | Type | Description |
|---|---|---|
| card | Integer | The card used for the authorization of payment. |
| name | String | The name that a customer enters for a card. This value is null if no changes are made to the card name. |
| cardHolderName | String | The name that a customer enters for a card holder. This value is null if no changes are made to the card name. |
| expiryMonth | String | The month in which a card expires. |
| expiryYear | String | The year in which a card expires. |
| preferred | String | The value of the parameter can be one of the following: True if a card is preferred. False if a card is not preferred. Null if the setting is not changed. |
| address | String | The address of the card holder. |
| authToken | String | The authentication token from the mProfile. |
| clientinfo | Object | The clientinfo object that specifies a customer. |
8.10 Delete a Card
If you use Delete a Card using auth token/access token/SSO token from the wallet, you must call the login API when a customer logs in. You can invoke the delete Card API only after the customer logs in.
You must send the following para card ID received in login API and set through viaAuthToken.
Use following method to delete card from a wallet:
public void deleteCard(cardid: Int, String : accessToken, clientinfo : mPointClientInfo, viaAuthToken : Boolean)
The descriptions of the parameters are listed in the table below.
| Parameter | Type | Description |
|---|---|---|
| cardid | Integer | The identification number of the card that will be deleted. |
| accessToken | Alphanumeric string | A customer's authentication token or password. |
| clientinfo | Object | The client information that needs to be included in a request. |
| viaAuthToken | Boolean | Defines if the access is through an authentication token or a password. |
8.11 Delete Account
You can use the following code sample to enable customers to delete their account.
public void deleteAccount(password : String, accessToken : String, account : mPointAccountInfo, clientinfo : mPointClientInfo)
The descriptions of the parameters are listed in the table below.
| Parameter | Type | Description |
|---|---|---|
| password | String | User password to log in. |
| accessToken | Alphanumeric string | The customer’s authentication token or password. |
| account | Object | The mPoint user account information. |
| clientinfo | Object | The client information that needs to be included in the request. |
8.12 Handle Error
When using the split payment option, after getting callback in displayPaymentConfirmation you need to call getTxnStatus method to retrieve status of the transactions. When calling getTxnStatus pass session ID (available in mPoint class) to retrieve all transactions from the current session. To call getTxnStatus, use the following code sample:
if(isSplitPaymentApplicable){
    	if(mpoint!!.sessionId != null && mpoint.sessionId.isNotEmpty()){
   		mPoint.delegate = this
              mPoint.getTxnStatus(-1, "", mpoint.sessionId, clientInfo)
  	  }
}
To get transaction statuses response implement following delegate method:
override fun handleTxnStatus(arrListTxnStatusInfo: ArrayList<mPointTxnStatusInfo>?, paymentStatus: Int, arrListLinkedTransactions: ArrayList<mPointLinkedTransactions>?, mPoint: mPoint?) {

            runOnUiThread {
                var pendingAmount: Long = 0

                if(null != arrListTxnStatusInfo && arrListTxnStatusInfo.size > 0){
                    for (txnStatusInfo : mPointTxnStatusInfo in arrListTxnStatusInfo){
                        // Retrieve Pending Amount
                        pendingAmount = txnStatusInfo.pendingAmount
                    }
                }

                when (paymentStatus) {
                    com.cellpointmobile.sdk.mPoint.PAYMENT_STATUS.MPOINT_PAYMENT_STATUS_PENDING.id ->
                    // Poll getTxnStatus()
                    getTxnStatus(mPoint!!.sessionId)
                    com.cellpointmobile.sdk.mPoint.PAYMENT_STATUS.MPOINT_PAYMENT_STATUS_COMPLETE.id -> {
                        if(pendingAmount == 0L)
                            // Split Payment Successful
                        else
                            // Retry Payment with Pending Amount
                    }
                    com.cellpointmobile.sdk.mPoint.PAYMENT_STATUS.MPOINT_PAYMENT_STATUS_FAILED.id -> {
                        // Retry Payment with Pending Amount
                    }
                }
            }
    }
The merchant front end reads the response received to know the payment status. Read the paymentStatus parameter to know the status of the payment. If a transaction status has payment status as:
- Pending: call the getTxnStatus API again until you get the payment status either as Successful or Failed.
- Complete: the payment is successful.
- Failed: retry the payment.
To retry the payment, initialize the payment with the pending amount. This action helps a customer complete the payment using any option.
Send the pending amount you received from back end in the initialize request. After you initialize, a customer can complete the payment using any available payment option or can split the payment. This process repeats until the transaction is successful, fails, or maximum retries are attempted.
Note: If a customer decides not to retry a failed payment, call the Post-Status API as shown in the following code sample to notify that the session is complete:
mPoint.postStatus(mPoint.sessionId)
Refer to Handle Error for details.
8.13 Handle Status
Refer to Handle Status for details.
8.14 Sending FX Indicator
Refer to Sending FX Indicator for details.
9. Integration for APM
You can easily integrate SDK with an Android device for an APM. However, the integration workflow depends on an APM used for a transaction. This section provides an example for PayPal.
9.1 Application Configurations
Before you start integrating the SDK for APM transactions, you need to make the following configurations in your mobile application. To integrate the SDK with an Android device for an APM, complete the following steps:
- Add the following line to build.gradle file of your app:
implementation "com.cellpointmobile.mpoint:mPoint:2.5.0@aar" - Copy PPFraud.jar file into libs folder of your application.
Note: Include this jar only if you opt for fraud detection feature.
- Add the following line to build.gradle file of your application:
compile 'com.android.support:customtabs:28.0.0' - Add the following intent filters to the activity to implement mPoint initialization and authorization. This is achieved using deep linking.
<intent-filter>
    <action android:name="android.intent.action.VIEW" />

    <category android:name="android.intent.category.DEFAULT" />
    <category android:name="android.intent.category.BROWSABLE" />
    <!—the following host and scheme is required to return call back from Paypal-->
    <data
        android:host="[MERCHANT URL].<CLIENT_HOST_DOMAIN_PREFIX>.PayPalReturn"
        android:scheme="cellpoint" />
</intent-filter>
9.2 Instantiate SDK
See Instantiate SDK for details.
9.3 Initialize Payment for APM
When you initialize a payment for APM, a call is sent to the SDK to authorize the payment. The following code sample shows the authorize call that you need to send to the SDK:
var addressInfo = [mPointAddressInfo]
var authToken = [AUTH_TOKEN]

mPoint.authorize(mPointAuthorizeInfo(cardInfo)
.setActivity(activity)
.setAddressInfo(addressInfo)
.setClientInfo(clientInfo)
.setAuthToken(authToken))
Note: The setAuthToken parameter can be optional or required, depending on merchant requirement.
9.4 Presentment Currency
This is a subscription-based feature. You can show the price of your product or services on your website or app-in presentment currencies. However, you cannot make settlement in that currency. Velocity enables you to make the settlement in the configured currency.
When making payments, customers select a currency in which they want to make payment. On the payment page, Velocity converts this currency into the settlement currency and facilitates the payment in the configured settlement currency
This feature is enabled for APM and wallet. It utilizes the FX flow in Velocity. In the initialize payment response, in the card node, if FX and presentment flags are true, call the FX API to fetch available currencies. To call the FX API, refer to the following code sample
var cardInfo : mPointCardInfo
    if(cardInfo.isDcc && cardInfo.isPresentmentCurrency){
// Fetch settlement currencies from initialize response and send it in Fx Service api request
        val settlementCurrencies = cardInfo.settlementCurrencies
        if(settlementCurrencies != null && settlementCurrencies.size > 0){

Call Fx API for Presentment Currency to fetch available currencies
        val amount : Long
val currency : Int
     val saleAmount: mPointAmountInfo = mPointAmountInfo().setCurrency(currency).setPrice(amount)

        val offerCriteria: mPointExchangeOfferCriteria =
                mPointExchangeOfferCriteria().setOrderNumber(orderID)
                        .setCardType(cardInfo.type)
                        .setCountry(CountryConfig.COUNTRY_CODES.getValues().get(countryCode)).country)
                        .setSaleAmount(saleAmount)
                        .setTransactionId(mPoint.txnInfo.id)
                        .setClientId(clientId)
                        .setClientInfo(clientInfo)
                        .setSettlementCurrencies(settlementCurrencies)

  _mPoint.delegate = context        _mPoint.getForeignExchangeOffer(offerCriteria)

}
After receiving the FX API response, create mPointForeignExchangeInfo object. Display the available currency and exchange amount to the customer. Refer to Dynamic Currency Conversion for details. Refer to the following code sample:
override fun displayForeignExchangeOffers(offer: mPointExchangeOffer?, mpoint: mPoint?) {
var fxInfo : mPointForeignExchangeInfo = mPointForeignExchangeInfo()
.setId(offer?.foreignExchangeOfferId!!)
.setExchangeAmount(offer.paymentCurrencyOffers[0].exchangeAmount.price)
        .setExchangeCurrencyId(offer.paymentCurrencyOffers[0].exchangeCurrency.isoNumericCode)
.setSaleCurrencyId(offer.paymentCurrencyOffers[0].saleCurrency.isoNumericCode)
        .setSaleAmount(offer.paymentCurrencyOffers[0].saleAmount.price)
.setConversionRate(offer.paymentCurrencyOffers[0].offeredExchangeRate)
.setHmac(offer.paymentCurrencyOffers[0].validationHmac)


fxInfo.isDccOpted = true
fxInfo?.serviceTypeId = mPointForeignExchangeInfo.SERVICE_TYPE_ID.PCC_OPT_IN
}
Note: Consider the following items:
- The mPointForeignExchangeInfo object might be required for the subsequent API calls.
- When creating mPointForeignexchangeinfo object, set isDccOpted as true for presentment currencies.
- Set the value service type ID for the mPointForeignexchangeinfo object, as PCC_OPT_IN as mentioned in the previous code sample. The process is similar to FX opt-in.
9.5 Authorize Payment
After you invoke the authorize the authorization of PayPal transaction. Override the following method in that activity and authorize mPoint.
var txnTypeId = [mPointTxnInfo.TXN_TYPES.MPOINT_SHOPPING_ONLINE.id]
var addressInfo = [mPointAddressInfo]
var authToken = [AUTH_TOKEN]

override fun onNewIntent(intent: Intent) {
    super.onNewIntent(intent)
     var params : List<String> = intent.data.pathSegments
    if (params.get(0).equals("return")) {
        // complete PayPal checkout
                 mPoint.authorizeWallet(cardInfo, clientInfo, txnTypeId, authToken, addressInfo)

    } else {
        // cancel PayPal checkout
          }
}
Note: Consider the following items:
• The authToken parameter is required only if it is present in the initialize request.
• It is important that the activity must include in the manifest android:launchMode="singleTask" //singleTop to activate onNewIntent.
9.6 Payment Confirmation
Implement the displayPaymentConfirmation call back method to receive the transaction status as shown in the following code sample:
override fun displayPaymentConfirmation(txn: mPointTxnInfo?, code: Int, mpoint: mPoint) {
        Log.d(TAG, "displayPaymentConfirmation")
    }
9.7 Initialize Payment for APM
When you initialize a payment for APM, a call is sent to the SDK to authorize the payment. Refer to the following code sample to make the authorize call, which you need to send to the SDK with the mPointForeignExchangeInfo object in authorize API request for presentment currency:
mPoint.authorize(mPointAuthorizeInfo(cardInfo)
        .setActivity(context)
        .setAddressInfo(addressInfo)
        .setClientInfo(clientInfo)
        .setAuthToken(authToken)
        .setForeignExchangeOffer(fxInfo))
9.8 Authorize Payment
After you invoke the authorize the authorization of PayPal transaction. Override the following method in that activity and authorize mPoint.
_mPoint.authorizeWallet(mPointAuthorizeWalletInfo()
        .setWallet(cardInfo)
        .setClientInfo(clientInfo)
        .setTxnTypeId(mPointTxnInfo.TXN_TYPES.MPOINT_SHOPPING_ONLINE.id)
        .setAuthToken(authToken)
        .setAddressInfo(addressInfo)
        .setForeignExchangeOffer(fxInfo))
9.9 Payment Confirmation
Implement the displayPaymentConfirmation call back method to receive the transaction status as shown in the following code sample:
Implement the displayPaymentConfirmation call back method to receive the transaction status as shown in the following code sample:
9.10 Handle Error
When using the split payment option, after getting callback in displayPaymentConfirmation you need to call getTxnStatus method to retrieve status of the transactions. When calling the getTxnStatus pass session ID (available in mPoint class) to retrieve all transactions from the current session. To call getTxnStatus, use the following code sample:
if(isSplitPaymentApplicable){
    	if(mpoint!!.sessionId != null && mpoint.sessionId.isNotEmpty()){
   		mPoint.delegate = this
              mPoint.getTxnStatus(-1, "", mpoint.sessionId, clientInfo)
  	  }
}
To get transaction statuses response implement following delegate method:
override fun handleTxnStatus(arrListTxnStatusInfo: ArrayList<mPointTxnStatusInfo>?, paymentStatus: Int, arrListLinkedTransactions: ArrayList<mPointLinkedTransactions>?, mPoint: mPoint?) {

            runOnUiThread {
                var pendingAmount: Long = 0

                if(null != arrListTxnStatusInfo && arrListTxnStatusInfo.size > 0){
                    for (txnStatusInfo : mPointTxnStatusInfo in arrListTxnStatusInfo){
                        // Retrieve Pending Amount
                        pendingAmount = txnStatusInfo.pendingAmount
                    }
                }

                when (paymentStatus) {
                    com.cellpointmobile.sdk.mPoint.PAYMENT_STATUS.MPOINT_PAYMENT_STATUS_PENDING.id ->
                    // Poll getTxnStatus()
                    getTxnStatus(mPoint!!.sessionId)
                    com.cellpointmobile.sdk.mPoint.PAYMENT_STATUS.MPOINT_PAYMENT_STATUS_COMPLETE.id -> {
                        if(pendingAmount == 0L)
                            // Split Payment Successful
                        else
                            // Retry Payment with Pending Amount
                    }
                    com.cellpointmobile.sdk.mPoint.PAYMENT_STATUS.MPOINT_PAYMENT_STATUS_FAILED.id -> {
                        // Retry Payment with Pending Amount
                    }
                }
            }
    }
The merchant front end reads the response received to know the payment status. Read the paymentStatus parameter to know the status of the payment. If a transaction status has payment status as:
- Pending: call the getTxnStatus API again until you get the payment status either as Successful or Failed.
- Complete: the payment is successful.
- Failed: retry the payment.
To retry the payment, initialize the payment with the pending amount. This action helps a customer complete the payment using any option.
Send the pending amount you received from back end in the initialize request. After you initialize, a customer can complete the payment using any available payment option or can split the payment. This process repeats until the transaction is successful, fails, or maximum retries are attempted.
Note: If a customer decides not to retry a failed payment, call the Post-Status API as shown in the following code sample to notify that the session is complete:
mPoint.postStatus(mPoint.sessionId)
Refer to Handle Error for details.
9.11 Handle status
Refer to Handle Status for details.
10. SDK Integration for Wallets
The integration workflow of an Android device with SDK for a wallet transaction depends on the wallet used for a transaction. This section provides an example of Google Pay wallet integration.
Before you start integrating a wallet, go through the list of prerequisites.
To integrate the SDK for a wallet payment, check for the following:
- Integration modes available - Android SDK, Web or Rest API, and Hosted Payment Page.
- List of supported payment methods by country - https://support.google.com/pay/answer/7454247
10.1 SDK Integration Checklist
Before you start the SDK integration process, ensure you have the following details:
- The base and mPoint SDKs of CPD for Google Pay Integration
- Client configuration details
- Google Android Integration checklist:
https://developers.google.com/pay/api/android/guides/test-and-deploy/integration-checklist
10.2 Application Configurations
Make the following configurations in your mobile application before you start integrating the SDK for wallet transactions.
10.2.1 Organize the Setup
To organize the setup, complete the following steps:
- Add dependencies in build.gradle file.
implementation 'com.google.android.gms:play-services-wallet:18.0.0'
implementation 'com.android.support:appcompat-v7:24.1.1'
- Update AndroidManifest.xml to enable Google Pay API.
<application
    ...
    ...
    <!-- Enables the Google Pay API -->
    <meta-data
        android:name="com.google.android.gms.wallet.api.enabled"
        android:value="true" />
10.2.2 Create Request Object
The mPoint SDK provides mPoint class to create request object based on the client configuration details. The request object is required to initiate the payment process.
this._mpoint = mPoint(URL ("[CPD provided URL]"),
        this,
        "username",[USERNAME]
        "password", [PASSWORD]
        clientid, [CLIENT ID]
        accountid, [ACCOUNT ID]
        null,
        context,
        null,
        RecordMap<String, String> (),
arrayOf(ClientInfo.IDENTIFIERS.DEVICEID)
 this._mpoint.mode = mPoint.OUTPUT_MODE.NONE)
10.3 Instantiate Payment
See Instantiate SDK for details.
10.4 Initialize Payment
To initialize a wallet payment, use the following code sample:
var mobile: Long = [MOBILE NUMBER];
var email: String = "[EMAIL ID]";
var countryId = CountryConfig.USA;   //[AMOUNT] for USA
var currencyId = [CURRENCY_ID]
var operatorId = countryId * 100;
var amount = [AMOUNT];
amount= amount*100;
var orderID : String = "[ORDER ID NUMBER]";
var mPointOrderInfo = [ORDER_INFO_AID_DATA]
var txnType: String = mPointTxnInfo.TXN_TYPES. MPOINT_SHOPPING_ONLINE; // Example of Search and Book Flow

mPointClientInfo  clientInfo = mPointClientInfo(appid, appversion, mPoint.LANGUAGES.da)
.setCountryId(countryId)
.setMobile(mobile)
.setEmail(email)
.setDeviceId(deviceid)
.setCustomerRef(customerRefId)
.setProfileId(profileId)

mPointInitializePaymentInfo paymentInfo = mPointInitializePaymentInfo()
                        paymentInfo.amount = amount
                        paymentInfo.country = CountryConfig.COUNTRIES.getValues().get(countryId)
                        paymentInfo.operator = operatorId
                        paymentInfo.mobile = mobile
                        paymentInfo.email = email
                        paymentInfo.language = mPoint.LANGUAGES.us
                        paymentInfo.setOrderno(orderID)
                       paymentInfo.clientinfo = clientInfo
                        paymentInfo.setCurrencyid(currencyId)
 paymentInfo.txnType = txnType
       paymentInfo.setHmac(hmac) OR
                        paymentInfo.secretSalt = salt


   paymentInfo.order = mPointOrderInfo
   paymentInfo.authToken = authToken
   paymentInfo.sessionId = sessionId

mpoint.initialize(paymentInfo);
Note: Consider the following items:
- The
mPointOrderInfois required only for order data. - The
authTokencan be made optional, depending on a merchant’s requirement. - The
sessionIdis required only for payment retries.
10.5 Presentment Currency
See Presentment Currency for details.
10.6 Initialize Payment
Call the following method to initialize the payment when a customer selects a third-party wallet for payment such as Google Pay.
var addressInfo = [mPointAddressInfo]
var authToken = [AUTH_TOKEN]


mPoint.authorize(mPointAuthorizeInfo(cardInfo)
.setActivity(activity)
.setAddressInfo(addressInfo)
.setClientInfo(clientInfo)
.setAuthToken(authToken))
Note: The authToken parameter can be optional or required, depending on the merchant requirement.
10.7 Authorize Payment
After the authorize method is called, customers can see their Google Pay accounts and cards stored in the wallet. When they select a card for payment, you get response in the following method:
override fun displayPaymentConfirmation(txn: mPointTxnInfo?, code: Int, mpoint: mPoint?)
10.8 Handle Error
When using the split payment option, after getting callback in displayPaymentConfirmation you need to call getTxnStatus method to retrieve status of the transactions. When calling the getTxnStatus pass session ID (available in mPoint class) to retrieve all transactions from the current session. To call getTxnStatus, use the following code sample:
if(isSplitPaymentApplicable){
    	if(mpoint!!.sessionId != null && mpoint.sessionId.isNotEmpty()){
   		mPoint.delegate = this
              mPoint.getTxnStatus(-1, "", mpoint.sessionId, clientInfo)
  	  }
}
To get transaction statuses response implement following delegate method:
override fun handleTxnStatus(arrListTxnStatusInfo: ArrayList<mPointTxnStatusInfo>?, paymentStatus: Int, arrListLinkedTransactions: ArrayList<mPointLinkedTransactions>?, mPoint: mPoint?) {

            runOnUiThread {
                var pendingAmount: Long = 0

                if(null != arrListTxnStatusInfo && arrListTxnStatusInfo.size > 0){
                    for (txnStatusInfo : mPointTxnStatusInfo in arrListTxnStatusInfo){
                        // Retrieve Pending Amount
                        pendingAmount = txnStatusInfo.pendingAmount
                    }
                }

                when (paymentStatus) {
                    com.cellpointmobile.sdk.mPoint.PAYMENT_STATUS.MPOINT_PAYMENT_STATUS_PENDING.id ->
                    // Poll getTxnStatus()
                    getTxnStatus(mPoint!!.sessionId)
                    com.cellpointmobile.sdk.mPoint.PAYMENT_STATUS.MPOINT_PAYMENT_STATUS_COMPLETE.id -> {
                        if(pendingAmount == 0L)
                            // Split Payment Successful
                        else
                            // Retry Payment with Pending Amount
                    }
                    com.cellpointmobile.sdk.mPoint.PAYMENT_STATUS.MPOINT_PAYMENT_STATUS_FAILED.id -> {
                        // Retry Payment with Pending Amount
                    }
                }
            }
    }
The merchant front end reads the response received to know the payment status. Read the paymentStatus parameter to know the status of the payment. If a transaction status has payment status as:
- Pending: call the getTxnStatus API again until you get the payment status either as Successful or Failed.
- Complete: the payment is successful.
- Failed: retry the payment.
To retry the payment, initialize the payment with the pending amount. This action helps a customer complete the payment using any option.
Send the pending amount you received from back end in the initialize request. After you initialize, a customer can complete the payment using any available payment option or can split the payment. This process repeats until the transaction is successful, fails, or maximum retries are attempted.
Note: If a customer decides not to retry a failed payment, call the Post-Status API as shown in the following code sample to notify that the session is complete:
mPoint.postStatus(mPoint.sessionId)
Refer to Handle Error for details.
10.9 Handle status
The status codes are returned by the SDK in a call back to the handleStatus method. This method enables the application to handle the status appropriately by implementing the method as shown in the following code sample:
The handleStatus method shows an error in the CPD server.
override fun handleStatus(statusInfo: mPointStatusInfo, client: Client, mpoint: mPoint) {}
11. SDK Integration for Offline Payment
Some merchants facilitate customers to make offline payment at their partner establishments. This section provides integration details for such offline payments.
11.1 Instantiate SDK
See Instantiate SDK for details.
11.2 Initialize payment
See Initialize Payment for details.
Note: For offline payment, if holding fee is applicable, send it in initialize-payment request. Refer to the following code sample to see how to send holding fee. Front end needs to have a provision to accept
holding fee.
// Set holding fee to mPointInitializePaymentInfo builder if holding fee is present
paymentInfo.holdingFees = Holding Fee amount
When creating Airline Data or Order Info for offline payment, pass the holding fee details as shown in the following code:
var lineItem = mPointLineItem(...)

lineItem.addAdditionalData("session_token", sessionToken)
lineItem.addAdditionalData("hold_fee_amount", holdFee)
lineItem.addAdditionalData("hold_fee_currency_code", currencyCode)
lineItem.addAdditionalData("hold_period", holdPeriod)
Note: The setAuthToken parameter can be optional or required, depending on merchant requirement.
11.3 Authorize Payment
When you initialize a payment for offline methods, send the authorize call to the SDK to process payment as shown in the following sample:
var addressInfo = [mPointAddressInfo]
var authToken = [AUTH_TOKEN]

mPoint.authorize(mPointAuthorizeInfo(cardInfo)
.setActivity(activity)
.setAddressInfo(addressInfo)
.setClientInfo(clientInfo)
.setAuthToken(authToken))
Note: The setAuthToken parameter can be optional or required, depending on merchant requirement.
11.4 Presentment Currency
See Presentment Currency for details.
Note: Consider the following items:
- If you use FX opt-in and FX opt-out, send the
mPointForeignExchangeInfoobject in subsequent calls such as authorize. - To create
mPointForeignexchangeinfoobject for offline method flow, setisDccOptedas false. - For
mPointForeignexchangeinfoobject, set value for service type id as PCC_OPT_OUT. The process is similar to FX Opt-out Transaction.
11.5 Payment Confirmation
Implement the displayPaymentConfirmation call back method to receive the transaction status as shown in the following code sample:
override fun displayPaymentConfirmation(txn: mPointTxnInfo?, code: Int, mpoint: mPoint) {
        Log.d(TAG, "displayPaymentConfirmation")
    }
11.5.1 Handle Error
When using the split payment option, after getting callback in displayPaymentConfirmation you need to call getTxnStatus method to retrieve status of the transactions. When calling the getTxnStatus pass session ID (available in mPoint class) to retrieve all transactions from the current session. To call getTxnStatus, use the following code sample:
if(isSplitPaymentApplicable){
    	if(mpoint!!.sessionId != null && mpoint.sessionId.isNotEmpty()){
   		mPoint.delegate = this
              mPoint.getTxnStatus(-1, "", mpoint.sessionId, clientInfo)
  	  }
}
To get transaction statuses response implement following delegate method:
override fun handleTxnStatus(arrListTxnStatusInfo: ArrayList<mPointTxnStatusInfo>?, paymentStatus: Int, arrListLinkedTransactions: ArrayList<mPointLinkedTransactions>?, mPoint: mPoint?) {

            runOnUiThread {
                var pendingAmount: Long = 0

                if(null != arrListTxnStatusInfo && arrListTxnStatusInfo.size > 0){
                    for (txnStatusInfo : mPointTxnStatusInfo in arrListTxnStatusInfo){
                        // Retrieve Pending Amount
                        pendingAmount = txnStatusInfo.pendingAmount
                    }
                }

                when (paymentStatus) {
                    com.cellpointmobile.sdk.mPoint.PAYMENT_STATUS.MPOINT_PAYMENT_STATUS_PENDING.id ->
                    // Poll getTxnStatus()
                    getTxnStatus(mPoint!!.sessionId)
                    com.cellpointmobile.sdk.mPoint.PAYMENT_STATUS.MPOINT_PAYMENT_STATUS_COMPLETE.id -> {
                        if(pendingAmount == 0L)
                            // Split Payment Successful
                        else
                            // Retry Payment with Pending Amount
                    }
                    com.cellpointmobile.sdk.mPoint.PAYMENT_STATUS.MPOINT_PAYMENT_STATUS_FAILED.id -> {
                        // Retry Payment with Pending Amount
                    }
                }
            }
    }
The merchant front end reads the response received to know the payment status. Read the paymentStatus parameter to know the status of the payment. If a transaction status has payment status as:
- Pending: call the getTxnStatus API again until you get the payment status either as Successful or Failed.
- Complete: the payment is successful.
- Failed: retry the payment.
To retry the payment, initialize the payment with the pending amount. This action helps a customer complete the payment using any option.
Send the pending amount you received from back end in the initialize request. After you initialize, a customer can complete the payment using any available payment option or can split the payment. This process repeats until the transaction is successful, fails, or maximum retries are attempted.
Note: If a customer decides not to retry a failed payment, call the Post-Status API as shown in the following code sample to notify that the session is complete:
mPoint.postStatus(mPoint.sessionId)
Refer to Handle Error for details.
11.5.2 Handle Status
Refer to Handle Status for details.
12. SDK Integration for Vouchers
The integration of an Android device with an SDK for a voucher transaction depends on the voucher used for a transaction. The following is an example of Travel Fund integration with Velocity SDK.
12.1 Travel Fund
Travel Fund (TF) acts as a virtual wallet and stores a customer’s cash refund. The amount is attributed to a PNR as a record locator and an expiry date, which can be retrieved and redeemed using the PNR. Merchants can configure the currencies for which TF is shown as a payment method during a transaction.
When customers select TF to make payment:
- Travel Fund is shown on the page for making payment.
- Customers enter their PNR number to know the voucher details such as:
- Balance amount
- Currency
- Expiry date
- After making payment using this voucher, customers can view their voucher details.
- See Display Payment Confirmation for payment details.
12.2 Instantiate SDK
See Instantiate SDK for details.
12.3 Initialize Payment for Travel Fund
See Initialize Request for details.
Additionally, send the session token in the initialize payment request. The following code sample shows how to send session token in the initialize-payment request:
var paymentInfo :mPointInitializePaymentInfo
var sessionToken: String // Session Token
…

paymentInfo.addAdditionalData("session_token", sessionToken)

…

mPoint.initialize(paymentInfo)
Add the following in displayAvailablePayments (availablePayments: mPointAvailablePayments?, mpoint: mPoint? method to read voucher cards.
override fun displayAvailablePayments(availablePayments: mPointAvailablePayments?, mpoint: mPoint?) {

if(availablePayments!!.vouchers != null && availablePayments.vouchers.size > 0){
   // Read Vouchers
   }
}
After reading the vouchers, the system can identify voucher as a payment method. To check the balance in the voucher, complete the following steps:
- Retrieve TF. To retrieve the TF balance, call the
getBalancemethod shown as follows.
var voucherId: String // 6-digit Booking Ref. No or PNR

var sessionToken: String
var clientInfo: mPointClientInfo

val getBalanceCriteria = mPointGetBalanceCriteria()
getBalanceCriteria.voucherId = voucherId
getBalanceCriteria.addAdditionalData("session_token", sessionToken)
getBalanceCriteria.clientInfo = clientInfo
mPoint.delegate = this
mPoint.getBalance(getBalanceCriteria)
The previous code sample provides the response for which you need to implement displayBalance method from mPointGetBalanceDelegate interface.
override fun displayBalance(balanceDetails: mPointBalanceDetails?, p1: mPoint?) {
// balanceDetails instance has properties amount, currency and  expiryDate. Use them to display information about Travel Fund.

}
- Redeem TF by using the authorize method. TF redemption has following scenarios:
- TF amount is more than booking amount- customers can utilize the entire TF amount to pay the booking amount.
- TF amount is less than booking amount- The UI shows that the balance amount is less than the booking amount and enables customers to make payment using another method. In this case, customers can use split payment method.
12.3.1 Authorize Payment for Voucher
To redeem the voucher, call the authorize method shown as follows:
var voucherId: String // 6-digit Booking Ref. No or PNR

var sessionToken: String

var countryCode: Int
var amount: Long

var currencyCode:  Int

var clientInfo : mPointClientInfo

var authToken: String
var additionalData: RecordMap<String, String>

var addressInfo: mPointAddressInfo


val travelFundVoucher = mPointTravelFundVoucher()
travelFundVoucher.voucherId = voucherId
travelFundVoucher.amount = PriceInfo(countryCode,amount,
        null, null, null, currencyCode,  -1)

mPoint.authorize(mPointAuthorizeInfo()
        .setClientInfo(clientInfo)
        .setViaAuthToken(true)
        .setPassword(authToken)
        .setVoucherInfo(travelFundVoucher)
        .addAdditionalData(additionalData)
        .setAddressInfo(addressInfo))
12.4 Display Payment Confirmation
Implement the displayPaymentConfirmation callback method to receive confirmation of payment as shown in the following sample:
override fun displayPaymentConfirmation(txnInfo: mPointTxnInfo?, code: Int, mpoint: mPoint?) {
}
12.5 Split Payment
If the retrieved TF amount is less than the booking amount, the customer can opt to split the payment.
The payment can be split with the Card & Travel Fund balance. The customer can pay the remaining amount by card after the redemption of the TF balance.
If FX is enabled on the selected card for split payment, then the FX flow execution remains the same.
12.5.1 Authorize Payment for Card and Voucher
Call authorize method as shown below to pay using split option.
var voucherId: String // 6-digit Booking Ref. No or PNR

var sessionToken: String

var countryCode: Int
var travelFundBalanceAmount: Long   // Travel Fund Balance to be redeemed
var cardPendingAmount: Long   // Remaining Balance to be paid through card payment

var currencyCode:  Int

var clientInfo : mPointClientInfo

var authToken: String
var additionalData: RecordMap<String, String>

var addressInfo: mPointAddressInfo
var cardType: mPointCardInfo
var cardNumber: Long
var expMonth: Int

var expYear: Int

var cvv: String

var cardName: String

var validFromExpMonth: Int

var validFromExpYear: Int

var isSaveCard: Boolean

var foreignExchangeInfo: mPointForeignExchangeInfo


// Voucher
var travelFundVoucher = mPointTravelFundVoucher()
    travelFundVoucher.voucherId = voucherId
 travelFundVoucher.amount = PriceInfo(countryCode, travelFundBalanceAmount, null, null, null, currencyCode,  -1)
}

// Card - Pending Amount
var priceInfo: PriceInfo? = null
    priceInfo = PriceInfo(countryCode, cardPendingAmount, null, null, null, currencyCode,  -1)


mPoint.authorize(mPointAuthorizeInfo(cardType)
        .setClientInfo(clientInfo)
        .setViaAuthToken(true)
        .setPassword(authToken)
        .setVoucherInfo(travelFundVoucher)
        .addAdditionalData(additionalData)
        .setCardNo(cardNumber)
        .setCardExpMonth(expMonth)
        .setCardExpYear(expYear)
        .setCvc(cvv)
        .setNameOnCard(cardName)
        .setCardValidFromMonth(validFromExpMonth)
        .setCardValidFromYear(validFromExpYear)
        .setStoreCard(isSaveCard)
        .setForeignExchangeOffer(foreignExchangeInfo)
        .setAddressInfo(addressInfo)
        .setPendingSplitAmount(priceInfo))
12.5.2 Authorize Payment for APM and Voucher
var mPointSplitCombination: mPointSplitCombination? = null

// Voucher
val travelFundVoucher = mPointTravelFundVoucher()
if(remainingBalanceToBePaidByTravelFund > 0)
{
    travelFundVoucher.voucherId = etBookingReferenceNumber.text.toString()
    travelFundVoucher.amount = PriceInfo(AppConstants.getCountryCode(country),
    (((remainingBalanceToBePaidByTravelFund.toFloat()) * getDecimalPointMultiplierFromCurrencyId(currencyCode)).roundToLong()),
    null, null, null, currencyCode,  -1)
}

// APM - Pending Amount
var priceInfo: PriceInfo? = null
if(remainingBalanceToBePaidByAPM > 0)
priceInfo = PriceInfo(AppConstants.getCountryCode(country),
    (((remainingBalanceToBePaidByAPM.toFloat()) * getDecimalPointMultiplierFromCurrencyId(currencyCode)).roundToLong()),
    null, null, null, currencyCode,  -1)


for(splitCombination in this.splitPayment!!.splitCombinations){
    for(paymentType in splitCombination.paymentType){
        if(paymentType.id == paymentTypeId){
            mPointSplitCombination = splitCombination
        }
    }
}

mPoint.authorize(mPointAuthorizeInfo(cardType)
    .setActivity(this)
    .setAddressInfo(addressInfo)
    .setClientInfo(clientInfo)
    .setAuthToken(authToken)
    .setForeignExchangeOffer(fxInfo)
    .setPendingSplitAmount(priceInfo)
    .setVoucherInfo(travelFundVoucher)
    .addAdditionalData(additionalData)
    .setSplitCombinations(mPointSplitCombination))
12.5.3 Authorize Payment for eWallet and Voucher
var mPointSplitCombination: mPointSplitCombination? = null

// Voucher
val travelFundVoucher = mPointTravelFundVoucher()
if(remainingBalanceToBePaidByTravelFund > 0)
{
    travelFundVoucher.voucherId = etBookingReferenceNumber.text.toString()
    travelFundVoucher.amount = PriceInfo(AppConstants.getCountryCode(country),
    (((remainingBalanceToBePaidByTravelFund.toFloat()) * getDecimalPointMultiplierFromCurrencyId(currencyCode)).roundToLong()),
    null, null, null, currencyCode,  -1)
}

// eWallet- Pending Amount
var priceInfo: PriceInfo? = null
if(remainingBalanceToBePaidByWallet> 0)
priceInfo = PriceInfo(AppConstants.getCountryCode(country),
    (((remainingBalanceToBePaidByWallet.toFloat()) * getDecimalPointMultiplierFromCurrencyId(currencyCode)).roundToLong()),
    null, null, null, currencyCode,  -1)


for(splitCombination in this.splitPayment!!.splitCombinations){
    for(paymentType in splitCombination.paymentType){
        if(paymentType.id == paymentTypeId){
            mPointSplitCombination = splitCombination
        }
    }
}

mPoint.authorize(mPointAuthorizeInfo(cardType)
    .setActivity(this)
    .setAddressInfo(addressInfo)
    .setClientInfo(clientInfo)
    .setAuthToken(authToken)
    .setForeignExchangeOffer(fxInfo)
    .setPendingSplitAmount(priceInfo)
    .setVoucherInfo(travelFundVoucher)
    .addAdditionalData(additionalData)
    .setSplitCombinations(mPointSplitCombination))
12.6 Display Payment Confirmation
Implement the displayPaymentConfirmation callback method to receive confirmation of payment as shown in the following sample.
override fun displayPaymentConfirmation(txnInfo: mPointTxnInfo?, code: Int, mpoint: mPoint?) {
}
When using split payment option and after getting callback in displayPaymentConfirmation, you need to call getTxnStatus method to retrieve status of the transactions. When calling the getTxnStatus, pass session ID (available in mPoint class) to retrieve all transactions from the current session.
To call getTxnStatus, use the following code sample:
if(isSplitPaymentApplicable){
    	if(mpoint!!.sessionId != null && mpoint.sessionId.isNotEmpty()){
   		mPoint.delegate = this
mPoint.getTxnStatus(-1, "", mpoint.sessionId, clientInfo)
  	  }
}
To get transaction statuses response implement following delegate method:
override fun handleTxnStatus(arrListTxnStatusInfo: ArrayList<mPointTxnStatusInfo>?, paymentStatus: Int, arrListLinkedTransactions: ArrayList<mPointLinkedTransactions>?, mPoint: mPoint?) {
        when (paymentStatus) {
           MPOINT_PAYMENT_STATUS_PENDING.id -> // Payment is Pending
           MPOINT_PAYMENT_STATUS_COMPLETE.id -> // Payment is Successful
           MPOINT_PAYMENT_STATUS_FAILED.id -> { // Payment is Failed
                        var pendingAmount: Long = 0
                        if(null != arrListTxnStatusInfo && arrListTxnStatusInfo.size > 0){
                        for (txnStatusInfo : mPointTxnStatusInfo in arrListTxnStatusInfo){
                                // Retrieve Pending Amount
                                pendingAmount = txnStatusInfo.pendingAmount
                            }
                        }
                      }
    }
The merchant front end reads the response received to know the payment status. Read the paymentStatus parameter to know the status of the payment. If a transaction status has payment status as:
Pending: call thegetTxnStatusAPI again till you get the payment status either asSuccessfulorFailed.Complete: the payment is successful.Failed: retry the payment.
To retry the payment, initialize the payment with the pending amount. This helps a customer complete the payment using any option.
Send the pending amount you received from back end in the initialize request. After you initialize, a customer can complete the payment using any available payment option or can split the payment. This process repeats until the transaction is successful, fails, or maximum retry is attempted.
Note: If a customer decides not to retry a failed payment, call the Post-Status API as shown in the following code sample to notify that the session is complete.
mPoint.postStatus(mPoint.sessionId
12.7 Handle Error
When using the split payment option, after getting callback in displayPaymentConfirmation you need to call getTxnStatus method to retrieve status of the transactions. When calling the getTxnStatus pass session ID (available in mPoint class) to retrieve all transactions from the current session. To call getTxnStatus, use the following code sample:
if(isSplitPaymentApplicable){
    	if(mpoint!!.sessionId != null && mpoint.sessionId.isNotEmpty()){
   		mPoint.delegate = this
              mPoint.getTxnStatus(-1, "", mpoint.sessionId, clientInfo)
  	  }
}
To get transaction statuses response implement following delegate method:
override fun handleTxnStatus(arrListTxnStatusInfo: ArrayList<mPointTxnStatusInfo>?, paymentStatus: Int, arrListLinkedTransactions: ArrayList<mPointLinkedTransactions>?, mPoint: mPoint?) {

            runOnUiThread {
                var pendingAmount: Long = 0

                if(null != arrListTxnStatusInfo && arrListTxnStatusInfo.size > 0){
                    for (txnStatusInfo : mPointTxnStatusInfo in arrListTxnStatusInfo){
                        // Retrieve Pending Amount
                        pendingAmount = txnStatusInfo.pendingAmount
                    }
                }

                when (paymentStatus) {
                    com.cellpointmobile.sdk.mPoint.PAYMENT_STATUS.MPOINT_PAYMENT_STATUS_PENDING.id ->
                    // Poll getTxnStatus()
                    getTxnStatus(mPoint!!.sessionId)
                    com.cellpointmobile.sdk.mPoint.PAYMENT_STATUS.MPOINT_PAYMENT_STATUS_COMPLETE.id -> {
                        if(pendingAmount == 0L)
                            // Split Payment Successful
                        else
                            // Retry Payment with Pending Amount
                    }
                    com.cellpointmobile.sdk.mPoint.PAYMENT_STATUS.MPOINT_PAYMENT_STATUS_FAILED.id -> {
                        // Retry Payment with Pending Amount
                    }
                }
            }
    }
The merchant front end reads the response received to know the payment status. Read the paymentStatus parameter to know the status of the payment. If a transaction status has payment status as:
- Pending: call the getTxnStatus API again till you get the payment status either as Successful or Failed.
- Complete: the payment is successful.
- Failed: retry the payment.
To retry the payment, initialize the payment with the pending amount. This action helps a customer complete the payment using any option.
Send the pending amount you received from back end in the initialize request. After you initialize, a customer can complete the payment using any available payment option or can split the payment. This process repeats until the transaction is successful, fails, or maximum retries are attempted.
Note: If a customer decides not to retry a failed payment, call the Post-Status API as shown in the following code sample to notify that the session is complete:
mPoint.postStatus(mPoint.sessionId)
Refer to Handle Error for details.
12.8 Handle Status
Refer to Handle Status for details.
Note: You should verify in handle status method if the customer is trying to make a payment using split payment. If yes, you should give a call to getTxnStatus method with session ID. See the example code sample below.
if(isSplitPaymentApplicable){
    if(statusInfo!!.sessionId != null && statusInfo.sessionId.isNotEmpty()){

        mPoint.delegate = this
  mPoint.getTxnStatus(-1, "", statusInfo.sessionId, clientInfo)

  	  }
}
To get transaction statuses response implement handleTxnStatus delegate method and repeat the same steps as mentioned above in handleTxnStatus method.
13. SDK Integration for Aggregators
This section provides integration details for aggregators.
13.1 Instantiate SDK
See Instantiate SDK for details.
13.2 Initialize payment
See Initialize Payment for details.
13.3 Authorize Payment
The front-end application needs to display the available list of payment methods. After the you select a particular payment method out of the list, you can initialize a payment for aggregators by sending the authorize call to the SDK to process payment as shown in the following sample:
var addressInfo = [mPointAddressInfo]
var authToken = [AUTH_TOKEN]
var paymentMethod = [mPointCardPaymentMethod] // Selected Payment Method


mPoint.authorize(mPointAuthorizeInfo(cardInfo)
.setCardPaymentMethod(paymentMethod)
.setActivity(activity)
.setAddressInfo(addressInfo)
.setClientInfo(clientInfo)
.setAuthToken(authToken))
Note: The setAuthToken parameter can be optional or required depending on merchant requirements.
13.4 Payment Confirmation
Implement the displayPaymentConfirmation call back method to receive the transaction status as shown in the following code sample:
override fun displayPaymentConfirmation(txn: mPointTxnInfo?, code: Int, mpoint: mPoint) {
        Log.d(TAG, "displayPaymentConfirmation")
    }
13.5 Handle Error
A handle error occurs when there an error in parsing. The status code reveals the type of error that has occurred in the SDK. For details of the status code, refer to Status Codes.
override fun handleError(errorInfo: mPointErrorInfo, client: Client, mpoint: mPoint) {}
13.6 Handle status
The status codes are returned by the SDK in a call back to the handleStatus method. This method enables the application to handle the status appropriately by implementing the method as shown in the following code sample:
The handleStatus method shows an error in the CPD server.
override fun handleStatus(statusInfo: mPointStatusInfo, client: Client, mpoint: mPoint) {}
14. Description of Parameters
14.1 Search and Book Workflow
| Parameter | Type | Required | Description | ||||||||||
|---|---|---|---|---|---|---|---|---|---|---|---|---|---|
| mobile | Integer | No | The mobile number of a customer. | ||||||||||
| String | No | The email address of a customer. | |||||||||||
| countryId | Integer | No | The CPD-specific country code, made available on request. | ||||||||||
| currencyId | Integer | No | The CPD-specific ID of a currency selected for making payment. | ||||||||||
| operatorId | Integer | No | The identification number of a customer’s Mobile Network Operator. A typical value is “country id” multiplied by 100. | ||||||||||
| amount | String | No | The amount for a product or services that a customer pays. | ||||||||||
| orderID | Integer | No | The order ID details, required for airlines. | ||||||||||
| mPointOrder Info | Object | No | The object of mPointOrderInfo, which contains details of order data. | ||||||||||
| txnType | String | No | The type of transaction. The following table shows the transaction types.
|
14.2 FX Service Parameters
The description of parameters for the FX Service transaction is listed in the table below.
| Object Name | Description |
|---|---|
| OrderNumber | The order number of a transaction. |
| CardNumber | The card used in a transaction. |
| CardType | The type of card used in a transaction such as Visa or Mastercard. |
| orderId | The order ID of a transaction. |
| amount | The amount that a customer pays for a transaction. |
| SaleAmount | The mpoint amount info object. It shows the amount and currency against which you want to offer exchange price. |
| TransactionId | The transaction ID generated during a transaction. |
| AccountId | The account ID of a transaction. |
| ClientId | The client ID. |
| clientinfo | The client info object. |
| CardId | The ID number of a stored card. |
15. Status Codes
15.1 Status Codes
The status codes are listed in the table below.
| Code | Category | Type | Description |
|---|---|---|---|
| 1001 | Payment | Payment Initialized with Velocity | The payment transaction is created in the Velocity database. |
| 1009 | Payment | Payment Initialized with PSP | The payment processor responsible for authorizing the payment has been initialized. |
| 1991 | Callback | Merchant Callback Constructed | The callback to the merchant application sent to callback-url has been constructed. |
| 1992 | Callback | Callback Connected | The connection with the merchant callback URL is established. |
| 1993 | Callback | Callback Connection Failed | The connection with the merchant callback URL failed. |
| 1990 | Callback | Callback Accepted | The merchant system returned an HTTP 200 OK and received the callback. |
| 1995 | Callback | Callback Rejected | The merchant system returned an HTTP $XX/5XX Error and rejected the callback. |
| 2000 | Payment | Authorized | The payment has been authorized successfully by the PSP. |
| 2002 | Payment | Cancelled | The authorized payment has been cancelled successfully by the PSP. |
| 2003 | Payment | Refunded | The captured payment refunded successfully (full / partial) by the PSP. The manual operation / delayed refund - pending states, initiated. |
| 2008 | Payment | Payment via Stored | Initialized payment with a stored card. |
| 2009 | Payment | Authorized and Card Stored | The payment has been authorized successfully by the PSP and the card stored on a successful authorization. |
| 2001 | Payment | Captured | The payment has been captured successfully by the PSP initiated for refund. |
| 2010 | Payment | Rejected | The payment was rejected by the PSP or Acquirer
|
| 20109 | Payment | Rejected sub state on timeout | Issuer down time; SDK returns this to the Velocity core. |
| 20108 | Payment | Rejected sub state on timeout | PSP down time; SDK returns this to the Velocity core. |
| 2011 | refund Payment | Declined | The payment was declined by the PSP / Acquirer while performing capture, refund, or cancel. No Vision impact; however, all declines have common state 2011. |
| 4020 | Session | Session Failed | The session failed or declined. One or more transactions in the session failed. |
| 4021 | Session | Session Failed | The session failed (maximum attempt exceeds). One or more transaction attempts failed. |
| 4030 | Session | Session Complete | The session completed successfully. The transactions in the session are complete and successful. |
| 4031 | Session | Session Partial | The session was partially completed. One or more transactions in the session were incomplete. |
| 4020 | Session | Session Failed | The session failed or declined. One or more transactions in the session failed. |
| Code | Description |
|---|---|
| 0 | Payment not made. |
| 1003 | Card expired. |
| 1005 | Invalid card number |
| 1011 | Invalid card name. |
| 1012 | Invalid card address. |
| 1013 | Invalid card date of birth. |
| 1014 | Card is inactive. |
| 2007 | Payment processed. |
| 2019 | Payment duplicated. |
| 2084 | Card not found. |
| 4030 | Payment success. |
| 40031 | Partial payment success. |
| 200 | Request validated and accepted by back end. |
| 400 | Request rejected by back end because of validation error. |
| 401 | Authentication required. |
| 403 | Access denied. |
| 415 | Message transmitted in an unknown format or by using an unsupported content type. |
| 500 | Velocity server error. |
| 502 | PSP returned an unknown error. |
| 504 | A timeout occurred while communicating with the PSP. |
15.2 Initialize Payment
The following table lists and describes the codes that you can receive after you initialize a payment:
| Code | Description |
|---|---|
| 1 | Undefined client ID |
| 1 | Client ID / Account doesn't match. |
| 2 | Invalid client ID |
| 3 | Unknown client ID |
| 4 | Client disabled |
| 11 | Undefined account |
| 12 | Invalid account |
| 13 | Unknown account |
| 14 | Account disabled |
| 401 | Authentication required. |
| 1002 | Internal database error - Unable to create a new Transaction. Contact [email protected] |
| 1003 | Internal database error - Unable to insert new message for Transaction. Contact [email protected] |
| 1004 | Internal database error - Unable to update Transaction. Contact [email protected] |
15.3 Authorize Payment
The following table lists and describes the codes that you can receive after a payment is authorized:
| Code | Description |
|---|---|
| 1 | Undefined client ID |
| 1 | Client ID / Account doesn't match. |
| 2 | Invalid client ID |
| 3 | Unknown client ID |
| 4 | Client disabled |
| 11 | Undefined account |
| 12 | Invalid account |
| 13 | Unknown account |
| 14 | Account disabled |
| 26 | Undefined password. |
| 27 | Password is too short; min length is 6 characters. |
| 28 | Password is too long; max length is 50 characters. |
| 29 | Password contains invalid characters or |
| 31 | Authentication failed. |
| 32 | Authentication failed – Next invalid attempt will delete the account. |
| 33 | Authentication failed – Account deleted. |
| 34 | Authentication rejected by the single sign-on server. |
| 35 | User account not found. |
| 36 | A timeout occurred while communicating with the single sign-on server. |
| 37 | Mobile number not verified. |
| 38 | Unable to perform single sign-on due to invalid Security Token or Authentication URL. |
| 39 | User account disabled. |
| 41 | Undefined card ID. |
| 42 | ID for the stored card is too small, min value is 1. |
| 43 | Stored card not found. |
| 43 | Insufficient balance on voucher. |
| 44 | Stored card disabled. |
| 51 | Insufficient balance on e-money account. |
| 52 | Insufficient balance on loyalty account. |
| 59 | Authorization type not supported for Transaction |
| 90 | The connection timed out while authorizing the payment with the PSP. |
| 91 | Internal Error: Unable to debit account |
| 92 | Authorization rejected by PSP / Acquirer. |
| 99 | Unknown PSP / Acquirer. |
| 100 | Payment Authorized using stored card. |
| 101 | Payment authorized using e-money account. |
| 102 | Payment authorized using loyalty account. |
| 103 | Authorization already in progress. |
| 400 | Wrong operation: authorization. |
| 401 | Authentication required. |
| 1002 | Internal database error - Unable to create a new Transaction. Contact [email protected] |
| 1003 | Internal database error - Unable to insert new message for Transaction. Contact [email protected] |
| 99 | Unknown PSP / Acquirer |
| 1004 | Internal database error - Unable to update Transaction. Contact [email protected] |
15.4 Capture Payment
The following table lists and describes the codes that you may receive after you initialize payment.
| Code | Description |
|---|---|
| 1000 | Transaction captured successfully |
| 999 | Declined |
| 400 | Invalid Request |
| 998 | Network Error |
| 997 | Capture not supported |
15.5 Refund Payment
The following table lists and describes the codes that you may receive after you initialize a refund request.
| Code | Description |
|---|---|
| 51 | The amount is undefined |
| 52 | The amount is too small |
| 53 | The amount greater than the authorized amount |
| 1000 | Transaction Refunded successfully |
| 1001 | Transaction Cancelled successfully |
| 999 | Declined |
| 9400 | Invalid Request |
| 9502 | Bad Gateway |
| 9500 | Internal Sever Error |
| 998 | Network Error |
Updated about 1 year ago